Hi Everyone, after my last three Valentines which were bright and colourful I wanted to make one that was a completely different style. I didn’t really know where I was going with this one at
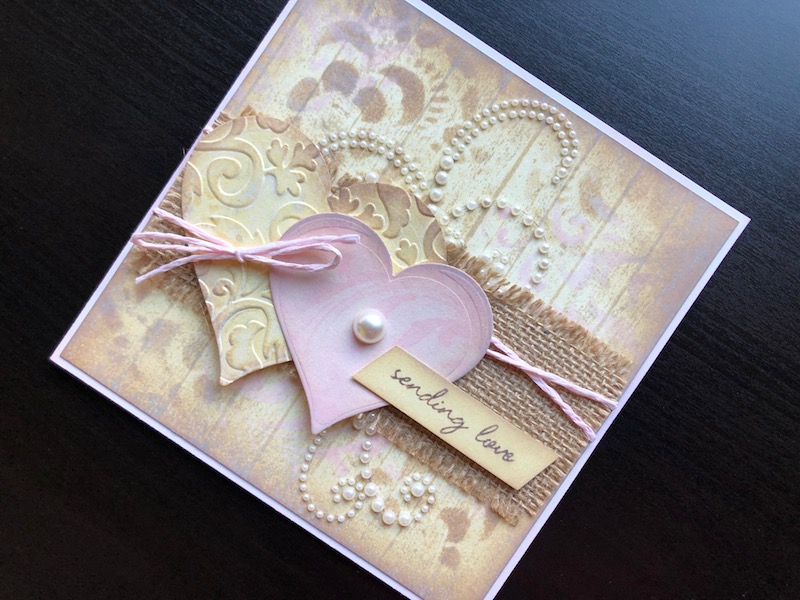
Hi Everyone, after my last three Valentines which were bright and colourful I wanted to make one that was a completely different style. I didn’t really know where I was going with this one at first, all I had in mind was the pink/cream colour scheme and the wooden plank background stamp. I love the way it has turned out, the softness of the colours and the different layers and details.
I started by making the background panel, with a 14cm square piece of cream card. All the ink pads are distress oxides, the three colours that I used are Spun Sugar, Antique Linen and Frayed Burlap. All the supplies used are linked below.
Stamp the wooden plank background with Antique Linen, dry it off with a heat gun and then ink all over using a foam blending tool again with Antique Linen. Use the ink blending tool to put Frayed Burlap through a lace stencil over parts of the background, moving the stencil around to get different parts of the lace. Use the same process to put Spun Sugar through a flourish stencil. Gently mist the whole background with water, dry it off first with a cotton cloth (I use an old tea towel) or paper towel, then dry it fully with a heat gun. Ink all around the edges with Frayed Burlap. Add adhesive pearl flourishes.
Cut a piece of burlap/hessian ribbon 14cm long and use ultra strong double sided tape to adhere across the front of the panel. Wrap a length of pink paper cord around the panel over the hessian ribbon and tie it in a bow. Ink the edges of the card blank with Spun Sugar and use more double sided tape to attach the panel to the card front.
Die cut two sizes of heart from cream card, emboss the larger one with a flourish embossing folder, ink it all over with Antique Linen, then around the edges with Frayed Burlap. It doesn’t show up in the photo but I then sprayed it with Gold Glimmer Mist to add a subtle gold sheen. Dry it with a heat gun and attach it to the hessian panel underneath the paper cord bow using foam pads.
Generously ink the smaller heart all over with Spun Sugar, spray the flourish stencil with water then press it down onto the heart. Use a dry cloth or paper towel to blot any surplus water before lifting the stencil and blotting the heart. The water on the stencil activates the ink where it comes in to contact and when you take the stencil off and blot it that ink is removed leaving the dry ink behind with that lovely chalky finish. Ink around the edges of the heart with a tiny bit of frayed burlap, attach it over the the paper cord, overlapping the bigger heart, using adhesive foam pads. Stick a large adhesive pearl in the centre.
Stamp the greeting in Frayed Burlap on a strip of cream card, dry the ink with a heat gun then ink all over with Antique Linen and around the edges with Frayed Burlap. Cut the ends on a diagonal and adhere to the card front with a combination of double sided tape and adhesive foam pads.
I am so happy with this card, it is exactly the kind of look I was going for. I like the soft colours and subtle details and the contrast of the shiny pearls. I really hope you like it too and would love to hear what you think, if you could leave a comment to let me know.
Thank you for visiting.
Debbie x
Supplies list:
- White 6 x 6 blank card and envelope
- Cream card
- Distress Oxide ink pads, Frayed Burlap, Antique Linen and Spun Sugar
- Tim Holtz stencils Lace and Flourish
- Wooden Plank background stamp
- Foam ink blending tool
- Folding Heat Gun
- Adhesive pearl Flourishes natural
- Burlap/hessian ribbon
- Pink paper cord
- Flower Flourish embossing folder
- Nested Hearts die set
- Cosmic Shimmer Airless Mister Shimmering Gold
- Adhesive pearl clusters natural (for the large pearl)
- Many Messages clear stamp set (Discontinued)
- 6mm ultra high bond double sided tape
- 3mm adhesive foam pads
- Big Shot die cutting machine


