
Hi Everyone, here’s another card with a seaside theme. I had a lot of fun with this card and it turned out just the way I wanted which is a bonus! It takes a bit
Hi Everyone, here’s another card with a seaside theme. I had a lot of fun with this card and it turned out just the way I wanted which is a bonus! It takes a bit of time to make but only because you have to wait for the texture paste and ink to dry before you can complete it.

To Make The Card
Start with an A6 kraft card blank and layer with wood plank paper. Cut a piece of light beige card slightly smaller and stamp a wood plank background with brown ink.
Die cut a piece of white card approx. 8cm diameter, use a palette knife to spread white texture paste all over the circle leaving just a thin layer on one half but a thicker layer on the other. Use the palette knife to shape the thicker texture paste to look like waves and breakers. Leave to dry – 2 or 3 hours although overnight is best if you are not in a hurry.
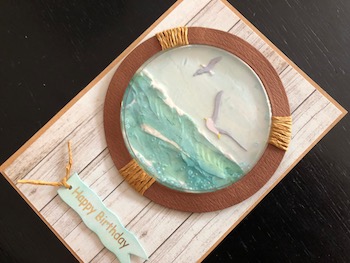
Once the texture paste is dry, take Tumbled Glass distress ink, Cracked Pistachio and Broken China distress oxide inks, spread some of each onto your craft mat and spritz with water. Dip an ordinary paint brush into the Tumbled Glass and paint the sky area, this should be quite dilute to give a pale wash of blue over the texture paste. Paint the sea with the Cracked Pistachio and Broken China, using them alternately and allowing them to blend in places. Leave some of the rough edges of the sea unpainted to look like foam on top of the waves. Again set this aside to dry.
Use two circle dies together to cut a frame from brown card. Take a length of natural paper cord and split it into two strands, pull one of the strands between your fingers to flatten and straighten it. Wrap the cord around the circle frame in three evenly spaced areas, securing it at the back with double sided tape. Keep a little bit of the paper cord to tie to the greeting.
Die cut two seabirds from white card, use marker pens or pencils to colour the wings grey and the beaks and feet yellow and glue to the sky area of the background.
Glue the background to the top centre of the card and pour some glass micro beads onto it. Glue around the rim of the shaker dome and position over the background. Use something like a book on top of the shaker dome to weigh it down and leave until the glue is dry. Use 3mm foam pads to adhere the porthole over the shaker dome.
Finally pop out a die cut birthday greeting, gently sand the edges to remove any notches and ink with Broken China distress oxide ink. Pierce a small hole at one end and cut a V shape at the other to make it look like a flag, tie a small piece of the natural paper cord through the pierced hole and adhere to the bottom of the card with 1mm foam pads.
There you have it, an interactive, 3D card with a beautiful sea view! I am particularly pleased with the way the sea turned out, I love the colour and the texture. I hope you like it too, thanks for visiting.
Debbie x
Supplies used:
- A6 kraft blank card
- A4 smooth beige card
- A4 smooth white card
- Brown card
- Wood Plank background stamp
- Tumbled Glass distress ink pad
- Broken China, Vintage Photo and Cracked Pistachio distress oxide ink pads
- Opaque texture paste
- Round plastic shaker dome
- Woodware Crafty Glue
- 3mm foam pads
- 1mm foam pads
- Natural paper cord
- Circle Frames die set
- Seabirds die set
- Assorted marker pens
- White and gold die cut birthday messages
- Glass seed beads pastel colours
Gorgeous card! I love how you made the sea and porthole.
Love this card so much!
That is an amazing and beautiful card!
Great card! Thanks for the detailed instructions.
Beautiful card! I love it alot. You are amazing with the paste and the way you painted the whole picture. Wow!