
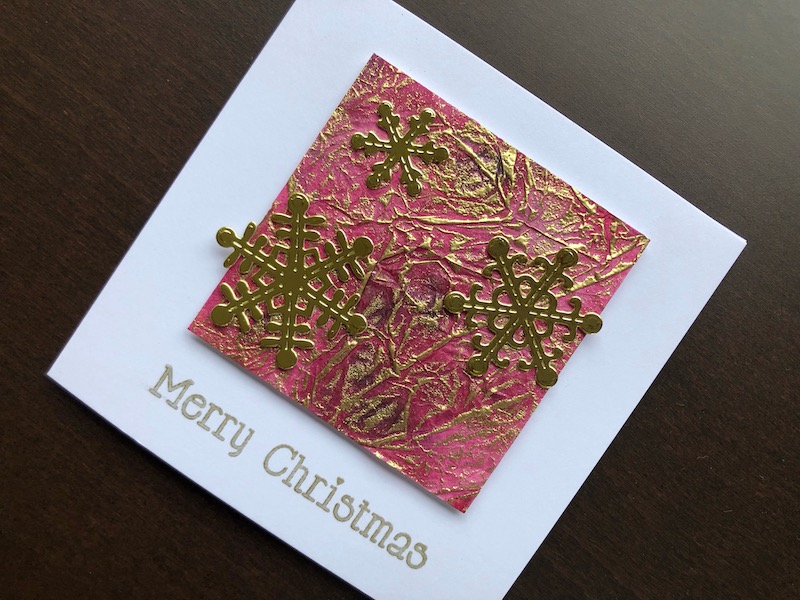
Hi everyone, in my first post about the inked tissue technique, I mentioned that I had also tried it with Pixie Sparkles. This is the result of that experiment. The Red Oxide Pixie Sparkles produce
Hi everyone, in my first post about the inked tissue technique, I mentioned that I had also tried it with Pixie Sparkles. This is the result of that experiment. The Red Oxide Pixie Sparkles produce a beautiful deep red colour with a pink shimmer, which looks great with the gold embossing. Again as there is so much colour, shine and texture in the tissue the card doesn’t need much else adding to it.

To Make The Card
Start by making the piece of inked tissue, cut white tissue paper to approx 12cm square, lay it on a craft mat, sprinkle with Pixie Sparkles and spritz with water. The Pixie Sparkles powder reacts with the water to bring out the colour and shimmer. Use a palette knife or similar to make sure the colour spreads all over the tissue. Carefully lift the wet tissue up by the corners and lay it on a piece of kitchen roll. Leave it to dry for about 15 – 20 minutes. In the meantime die cut three different sizes of snowflake from gold mirror card.
When the tissue is completely dry, scrunch it up quite tightly then open it out again but don’t smooth it down as you want lots of ridges. Gently swipe over it with an embossing ink pad to ink the ridges. Sprinkle gold embossing powder all over, shake off the excess and use a small paintbrush to remove any embossing powder that has stuck to the flatter parts. I left some of the unintentional embossing powder where it was and am happy with the results. Heat set the embossing powder.
Glue the tissue to a piece of white card and trim it down to 8cm square. Put a 5 x 5 inch white card blank in to a stamp positioning tool, place the tissue panel where you want it then put the sentiment stamp below. Lift the tissue panel away and stamp the sentiment in gold ink. Once the sentiment is dry, attach the tissue panel above it using foam tape to lift it. Finally glue the snowflakes into position.
I love the rich colour and shine on this card, and the way the simple sentiment and plain background make the embossed tissue really pop. Thank you for reading, all the supplies used are linked below.
Debbie x
Supplies used:
- White 5 x 5 inch blank card and envelope
- White tissue paper
- Red Oxide Pixie Sparkles
- Versamark embossing ink pad
- Metallic Gold embossing powder
- Sizzix heat gun
- Gold mirror card
- Snowflakes and Frame die set
- Big Shot die cutting machine
- Press to Impress stamp positioning tool
- Essential Festive Sentiments clear stamp set
- Gold pigment ink pad
- Woodware Crafty glue
- 2mm adhesive foam tape