
Hi, here’s a card that uses several different techniques to achieve the various layers of stamping and emboss resist, as well as water colouring with inks for the flower. It’s a bit of a different
Hi, here’s a card that uses several different techniques to achieve the various layers of stamping and emboss resist, as well as water colouring with inks for the flower. It’s a bit of a different type of card for me, and not a die cut piece in sight!!

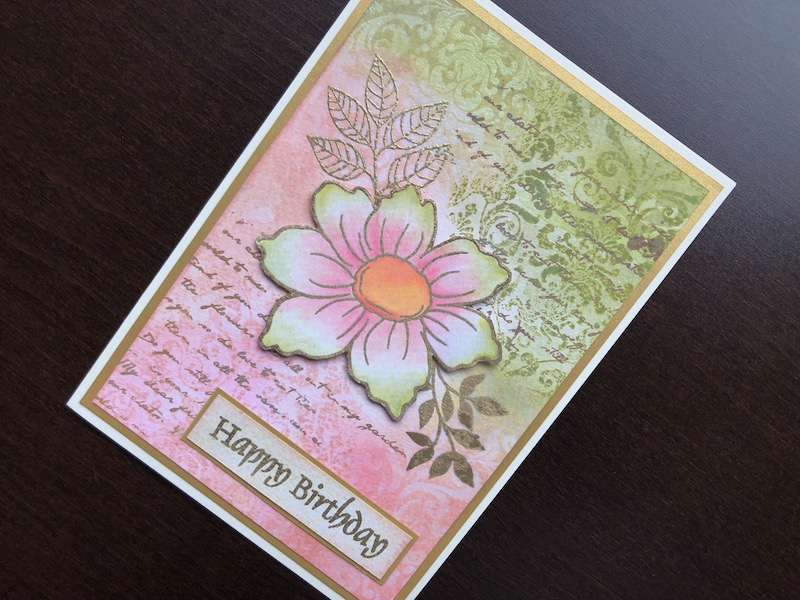
To Make The Card
Start with a cream 5″ x 7″ blank card and trim it down to 12.2cm x 17.2cm. I know this is an odd size but I changed my mind about it and this is what I ended up with. Add a layer of gold card, 11.7cm x 16.7cm. Cut a piece of watercolour card 11cm x 16cm. Smoosh two shades of green ink on a water resistant surface, spritz with water and dip a corner of the watercolour card first into the lighter green then just dabble in the darker green. Repeat this process with two shades of pinky peach ink to cover the other two thirds of the card. Dry with a heat gun.
Ink up a corner of a damask stamp with the darker green ink, spritz with a little water and stamp onto the green corner. Again repeat the process to add a darker pink damask pattern to the opposite corner. Clean off the stamp and ink with clear embossing ink. Stamp first on the green opposite the damask stamping and heat emboss with clear embossing powder. Use a foam ink blending tool to ink over the embossed area with the same colour of green ink. Use a paper towel to buff the embossed area and remove any ink from the embossed parts. Do the same thing in pink in the opposite corner.
Ink up part of a script stamp with mid brown ink and stamp over the green corner, repeat in the opposite pink corner. Dry the ink with a heat gun. Finally ink up the hatched design stamp with beige ink, spritz with water and stamp randomly on any plain looking areas. Again dry with a heat gun.
Stamp the flower in embossing ink and heat emboss with gold embossing powder. Smoosh some of each of the pink and green ink on your craft surface, then use a water brush pen to “paint” the flower. Dip the pen into the ink and then draw it out on the flower, blending the colours as you go. Add some yellow ink for the flower centre. Once it is dry, fussy cut the flower and run a gold metallic marker pen around the raw edges to cover the white. Position the flower on the background piece to work out where the leaves should be stamped. Stamp the leaves and heat emboss in gold. Now adhere the background piece to the card front. Adhere the flower with foam pads to lift it up from the surface.
Cut a strip of watercolour card 7.3cm x 1.7cm, ink it lightly with green ink, then edge it with pink. Stamp the Happy Birthday sentiment and heat emboss in gold. Mount the sentiment strip on gold card with a narrow border. Adhere the sentiment to the bottom right hand corner of the card.
There are quite a lot of different techniques and processes in the making of this card, but it is not difficult and the beauty of this type of card is that it does not have to be exact. Thank you for taking and interest. I hope you like the card. All the products used are linked below.
Debbie x
Products Used
- Cream 5″ x 7″ blank card and envelope
- Matt gold card
- A4 Watercolour card stock
- Distress ink pads Old Paper, Tattered Rose
- Distress Oxide ink pads Peeled Paint, Worn Lipstick, Vintage Photo, Antique Linen, Fossilised Amber
- Versamark Watermark ink pad
- Damask Cover a Card rubber stamp
- Clear embossing powder
- Heat gun
- Foam ink blending tool
- Old Letter clear stamp
- Dog Rose clear stamp set
- Gold Rich embossing powder
- Water tank brush pen
- Happy Birthday clear stamp set
- Stamp positioning tool
- Dries clear glue
- 1mm adhesive foam pads