
Hi I have seen a few of these U Bridge Fold cards on Pinterest and thought it was a great way to make something a bit unusual, I also like the fact that it folds
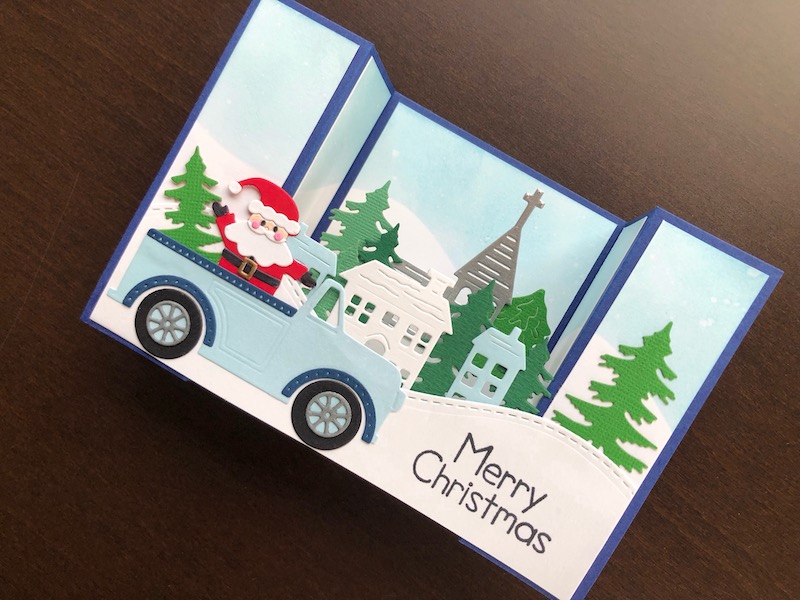
Hi I have seen a few of these U Bridge Fold cards on Pinterest and thought it was a great way to make something a bit unusual, I also like the fact that it folds down flat and fits in a standard C6 envelope. I got all the measurements etc. from The Craft Spa Blog, the only difference is that I cut the front strip deeper so that I could die cut the hillside effect. The die cut Santa was a bit fiddly to put together but well worth the effort!

To Make The Card
First create the card base, cut dark blue card to 22.5cm x 10.5cm, then score it at 3.5cm and 7cm in from either side. From left to right make mountain, valley, valley, mountain folds to create the U shaped structure. Now make the background scene, cut a piece of white card or paper 20cm x 10cm. Cut a piece of card with the hillside die to make a mask. Lay the hillside mask over the paper so that it comes at least halfway up and ink above it with blue ink. The mask will not be long enough to colour the whole scene at once, but can easily be joined up to give a continuous hillside. Set the mask aside and splatter water over the inked area then dab it off with a paper towel to create the appearance of snowfall. Cut the background scene into strips of 3cm, 3cm, 8cm, 3cm and 3cm, all 10cm high. Adhere the panels to the card base.
Die cut Santa and the car from various colours of card and assemble. I cut the card from light and dark blue cardstock to co-ordinate with the card colour scheme, but of course Santa had to be in red. Also die cut several houses and a church from blue, white and silver card, and 5 Christmas trees in different shades of green. Cut a piece of white card 15.5cm by approx. 5cm, die cut the top edge with the hillside die, this will go across the front of the card. Stamp the Merry Christmas greeting in black at the right hand end of the hillside piece.
Now make a small structure that some of the trees and houses will be attached to, so that they are set back into the U shape. Cut a strip of white card 10.5cm x 2.5cm, score and fold it at 1cm from each end. Make the folds in the same direction.

Arrange the trees, houses and church so that some are adhered to the back of the hillside panel and some are adhered to the internal strip. When you are happy with the layout, adhere the two tabs on the internal strip to the sides of the U shape. To attach the hillside strip it is important to make sure that the card will fold flat. Fold up the left section of the card with the right section laid flat. Adhere the left end of the hillside to the left front panel. Open out the left section and lay it flat and fold up the right section and adhere the right end of the hillside to the right front panel. Check that the card can lay flat in both directions before gluing. Finish off by adding Santa and his car with a Christmas tree in the back to the left end of the hillside panel.

Here you can see the card folded flat, it fits perfectly into a standard C6 envelope. I think this is a great fun card, with a bit of a difference. I hope you like it too, thank you for visiting, all the products used are linked below.
Debbie x
Products Used
- Various colours of card
- Extendable paper trimmer
- Snowy Scene Houses die set
- Tumbled Glass distress ink pad
- Foam ink blending tool
- Winter Pine Trees die set
- Santa Activities die set
- Big Shot die cutting machine
- Essential Festive Sentiments clear stamp set
- Black Soot distress oxide ink pad
- Double sided tape dispenser
- Dries clear glue