
Hi, the last two Valentine cards that I made were quite modern and in fairly bright colours so this time I wanted to go for something a bit darker and grungier maybe suitable for a
Hi, the last two Valentine cards that I made were quite modern and in fairly bright colours so this time I wanted to go for something a bit darker and grungier maybe suitable for a male recipient. It’s quite funny as the card is quite different to what I imagined at first but I am happy with the end result.

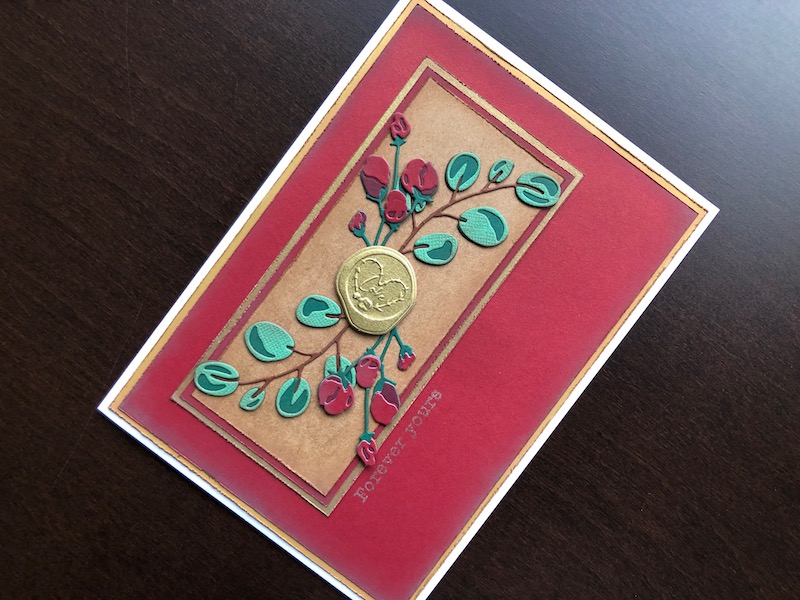
To Make The Card
Start with a white 5″ x 7″ blank card, and trim it down to 12.5cm x 17.5cm to make it easier to cut the layers. Cut the following pieces of card:
- Gold – 1 x 12cm x 17cm, 1 x 6.5cm x 14cm
- Dark red – 1 x 11.5cm x 16.5cm, 1 x 6cm x 13.5cm
- Kraft – 1 x 5.5cm x 13cm
Use a paper scruffer to roughen the edges of each piece, then ink all the edges with brown ink. Layer the card front with the larger gold and red pieces. Create a panel by layering up the smaller pieces, with the kraft on top.
Die cut the rose buds twice using a dark green for the stems, a very dark red for the first flower layer and the same red as the background for the second flower layer. Adhere them all together. Cut two leaf stems using brown for the stem, the same dark green as the buds stem for the first leaf layer and a lighter green for the second leaf layer. Roughly ink all the buds and leaves with brown ink. Cut and emboss the wax seal from gold card.
Lay the slim panel on the card to find the position for the stamped sentiment. Remove the panel and stamp the sentiment in brown ink. Once the sentiment is dry adhere the panel to the card front. Arrange the bud and leaf stems on the panel putting them opposite each other to create a mirrored image. Glue them in place then attach the wax seal over the stems in the middle. Use thin foam pads to attach the seal to raise it above the stems.
I am very pleased with this card, I like the subtle colour scheme and have been looking for a way to use the wax seal cut and emboss folder, this was my chance! Thank you for visiting, I hope you like it too. All the supplies used are linked below.
Debbie x
Products Used
- White 5″ x 7″ blank card and envelope
- Gold, red, dark red, green, dark green, kraft card stock
- Paper scruffer tool
- Foam ink blending tool
- Vintage Photo Distress Oxide ink pad
- Extendable paper trimmer
- Bloom Colorize die set
- Big Shot die cutting machine
- Wax Seals cut and emboss folder
- Wild Hearts clear stamp set (for the sentiment)
- Press to Impress stamp positioning tool
- Double sided permanent tape dispenser
- Dries clear glue
- 1mm adhesive foam pads