
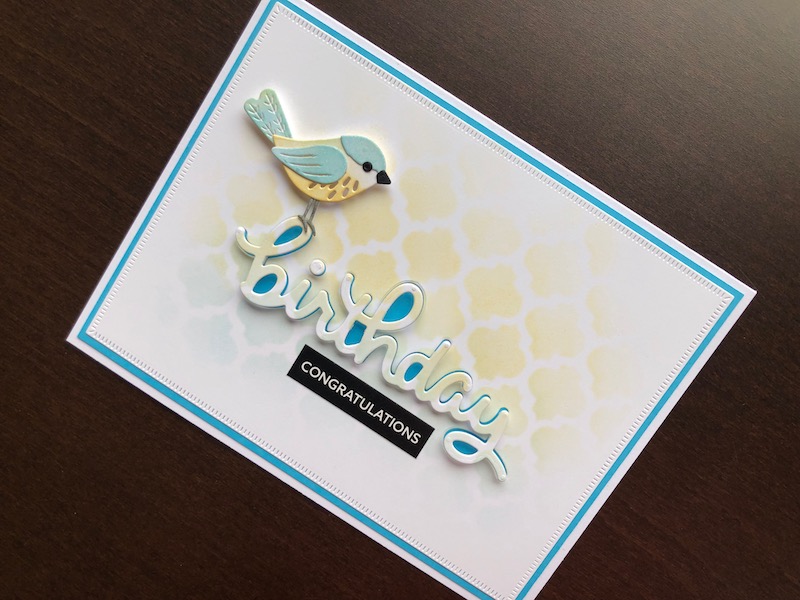
Hi, I love this little bird die set, it’s actually called Little Chickadee but I have tried to make mine look like a Blue Tit. Whatever the breed, it’s very cute. I have never made
Hi, I love this little bird die set, it’s actually called Little Chickadee but I have tried to make mine look like a Blue Tit. Whatever the breed, it’s very cute. I have never made an eclipse card before and am pleased with the results.

To Make The Card
Start with a white 5″ x 7″ blank card and trim it to 12.5cm x 16.5cm so that it is the same proportions as the rectangle die. Cut a piece of blue card 12cm x 16cm and adhere to the card front. Die cut a piece of white card with the 11.5cm x 15.5cm die from the set. Tape the white card to your work surface with removable tape. Place the stencil over one side of the card and tape in position at one end. Use a foam ink blending tool to add ink through the stencil, fade it in from the edges, with yellow in the top half and blue below. This will create a greenish area in the middle where the two colours blend together. Lift the stencil by the untaped end to check the colour. When you are happy with it, remove the stencil and position it over the other half of the card lining up the design with the area you have already coloured. Repeat the colouring process until the centre area of the card is covered and fades out to the edges.
Die cut the word Birthday from the stencilled panel, set the word aside and adhere the panel to the front of the card. Add pieces of narrow foam tape to the back of the word, then adhere it over the negative space. Cut the Congratulations from a Birthday Wordies sheet. Run a black marker pen around the edges to cover up any white, and adhere it to the card below the birthday word.
Die cut the bird’s body, cap, wing, tail and legs from white card. Use the same blue and yellow inks to colour them but apply the colour more heavily. Use a dark grey ink for the legs and cut the eye and beak from black card. Glue all the bird parts together, then adhere to the card standing on the letter B, use the same foam tape as for the word, so that the bird is on the same level.
I am very pleased with this card, I like the subtle colour of the background and I love the cute little bird. Thank you for visiting, I hope you like it too. All the products used are linked below.
Debbie x
Products Used
- White 5″ x 7″ blank card and envelope
- Blue card
- A4 Coconut White foundation card
- Extendable paper trimmer
- Nested Rectangle dies with small stripes edging
- Big Shot die cutting machine
- Trellis layering stencil
- Stencil tape
- Foam ink blending tool
- Distress ink pads Scattered Straw and Tumbled Glass
- Distress Oxide ink pad Black Soot (for the bird legs)
- Scripty Birthday die
- Little Chickadee die set
- Birthday Wordies sentiment sheet
- Double sided adhesive tape dispenser
- Dries clear glue
- 3mm adhesive foam tape