
Hi I have been wanting to use this lovely die set to make a card ever since it arrived about 10 days ago, I finally got my chance today. Although the set includes a background
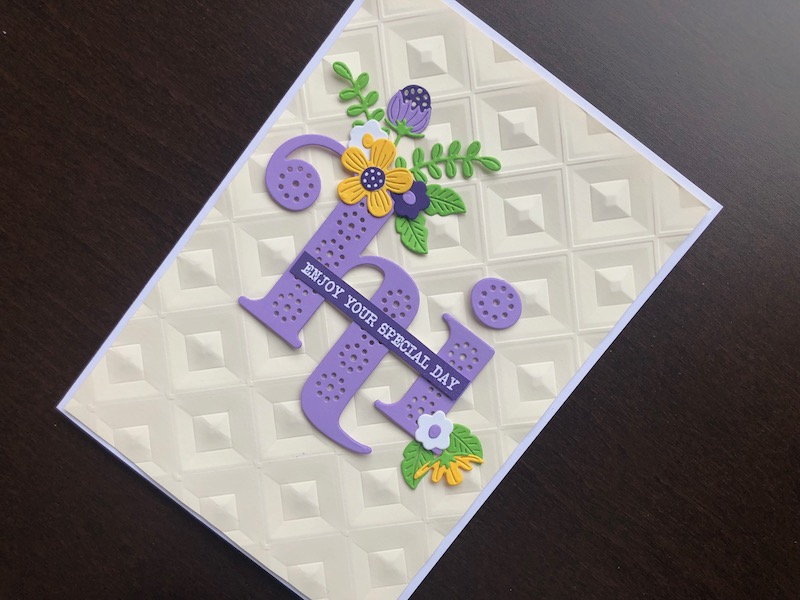
Hi I have been wanting to use this lovely die set to make a card ever since it arrived about 10 days ago, I finally got my chance today. Although the set includes a background for the letters and stitch holes, I decided to use it just as it is for this card. I plan to make another soon with background and stitching to show the full effect – watch this space. Even though it has been snowing all day I wanted to use spring colours and chose the yellow/purple theme as it reminds me of the crocuses that have come out recently.

To Make The Card
Start with a white 5″ x 7″ blank card and trim it down slightly to 12.5cm x 17.5cm to make it easier to measure the layer. Cut a piece of cream card 12cm x 17cm and dry emboss it with the diamond pattern. Adhere this to the card front.
Die cut the Hi from lilac card and adhere the letters to the card front. Use 1mm adhesive foam pads to raise it slightly from the surface so that the stems of the flowers and leaves can be tucked under it. Die cut three small flowers in purple, yellow and white, a larger flower, and a side view flower in yellow, and a berry stem in purple and lilac. Cut a selection of foliage in bright green. Cut contrasting colour centres for the flowers and glue them in place. Arrange some of the flowers and foliage around the top of the letter ‘H’ and a few more at the bottom of the letter ‘I’. Glue all the flowers in place, but leave the visible ends unglued to add to the dimension.
The sentiment stamp is a reverse stamp so the background colour is the ink and the card colour is the lettering. Use purple ink to stamp the sentiment on to white card. Cut around the edge of the purple background and ink the raw edge so that it is purple too. Adhere the sentiment across the middle of the main word. That’s it done! There are lots of ways you could vary this card, change the colours, use a different embossing folder for the background or choose a different sentiment. I am very pleased with it and am looking forward to using the Hi die set again soon. Thank you for reading, I hope you like it too. If you want to try it for yourself, all the products used are linked below.
Debbie x
Products Used
- White 5″ x 7″ blank card and envelope
- A4 Ivory foundation card
- Purple, lilac, yellow, white and green card
- Extendable paper trimmer
- Bevelled Diamonds 3D embossing folder
- Big Shot die cutting machine
- Stitched Hi die set
- Be Bold Blooms die set
- Sentiments and Wishes Essential clear stamp set
- Press to Impress stamp positioning tool
- Villainous Potion Distress Oxide ink pad
- Dries clear glue
- 1mm adhesive foam pads
- Double sided adhesive tape dispenser