Hot Foiling
Here are a few tips to help you get the best out of your hot foiling equipment.
- When using a hot foil stamp for the first time, make sure to remove all the adhesive from the back of the stamp so that it doesn't melt onto the heating plate.
- When you cut the foil ready to use, trim off the corners to prevent surplus foil from being transferred.
- It's not always easy to line up your hot foil stamp and the card when the stamp is covered with the heat activated foil, use a slightly larger piece of card than you need and trim or die cut it to shape after you have stamped your foiled image.
- You may find that you need to add one or more sheets of card to act as shims when running the plate through your die cutting machine. The number of shims required will vary from machine to machine so be prepared to experiment. Keep in mind you don't need too much pressure as this may damage the heating platform.
- When you put the heating plate through your die cutting machine roll more slowly than you normally would for die cutting, and roll it through at least twice.
- Once you have run it through the die cutting machine, gently rub over the foiled image with your finger before you peel away the surplus foil to make sure that the foil has transferred fully.
Materials to Foil On To
- Card and paper
- Chipboard
- Vellum
- Leather
- Ribbon
- Wood
Additional Techniques
As well as using hot foil stamps to create a foiled image, you can also use cutting dies and embossing folders. This is a great way to get more out of your existing stash and extend the use of the your hot foil machine.

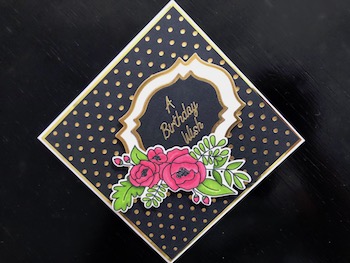
The foiled polka dot background on this card was created with an embossing folder and the gold foil edges to the die cut shapes were created by foiling with cutting dies. For full instructions on how to make this card click here.
Hot Foiling with Embossing Folders
Bring your hot foil machine up to temperature, open the embossing folder and lay it on the heating plate with the raised design facing upwards, put the foil over it with the coloured side down and the card stock on top of that. Close the embossing folder, add a couple sheets of card to act as shims, close the lid and let it heat up for about a minute. This doesn't cause any damage to the embossing folder. Remove the heating plate from the base and run it all through your die cutting machine. Remove the embossing folder from the heating plate and peel away the excess foil to reveal your foiled and embossed design.
Hot Foiling with Cutting Dies
You can use either side of the cutting die to foil the image depending on how thick you want the foiled line to be. If you are foiling the wider side of the die you will be placing the die with the cutting edge on the heating plate, to stop the die from cutting into the heating plate, place a metal shim on it. Using the metal shim will usually mean you need fewer cardstock shims. Lay the cutting die on the metal shim with the cutting edge facing down, lay the foil over the die, coloured side down and the card over the foil. Let it all heat up for a minute or so and then remove the heating plate from the machine and run the whole thing slowly through your die cutting machine. Lift off the card, smooth down the foil with your finger, then peel away the excess foil.

