Hi, I really enjoyed using the Bubble Bloom Festive Tree stamp to make a Christmas card a couple of years ago, so when Woodware introduced a new range of Bubble Bloom stamps I couldn’t wait
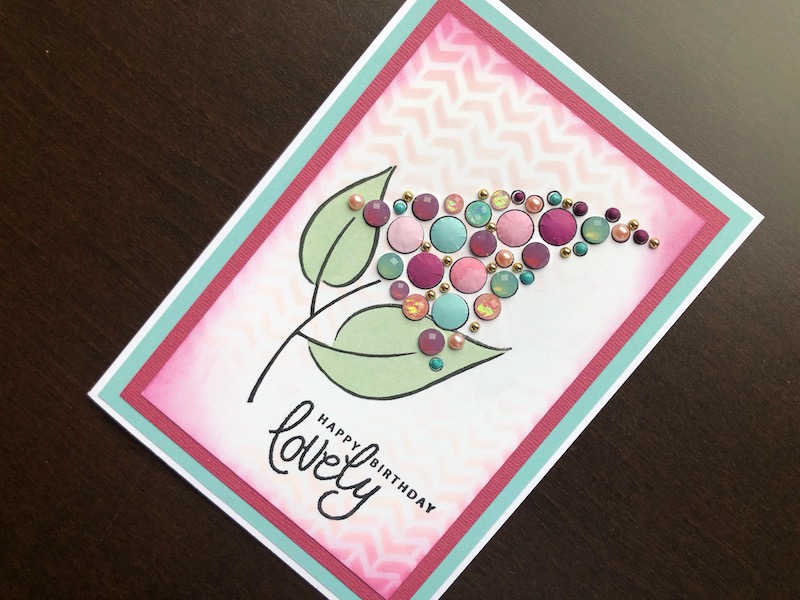
Hi, I really enjoyed using the Bubble Bloom Festive Tree stamp to make a Christmas card a couple of years ago, so when Woodware introduced a new range of Bubble Bloom stamps I couldn’t wait to try them out. This design is Bubble Bloom Fizzie, and has a flower head shaped like a lilac. The stamp creates the flower in different sized circles, ready for you to decorate. You can use any round adhesive gems etc. or cut your own from coloured paper. I wanted to use the Watercolour Florals self adhesive crystals for this as I love the colour combination.

To Make The Card
Start with a 5″ x 7″ white blank card, and trim it down to 12.5cm x 17.5cm. Layer this with turquoise card 12cm x 17cm, then dark pink card 1cm smaller. Cut a piece of white card 10cm x 15cm, stencil the Chevron design in the top left and bottom right areas of the card, fading the ink towards the centre. Use Spun Sugar Distress Oxide for the stencilling and then ink around the edges of the card with Seedless Preserves. Stamp the Bubble Bloom Fizzie in black, towards the top left of the card, and the greeting below it and to the right. Stamp the leaves again in black on a piece of green paper. Fussy cut just the leaves, and glue them over the stamped leaves on the card. Adhere this panel to the card front.
Use the Bubble Craft Die to cut circles of pink, plum and turquoise card. Lay the large circles on a shaping mat, and rub a ball tool in circles to shape them into domes. Add a 1mm adhesive foam pad to the back of each one and adhere them to the biggest circle shapes on the flower. Add adhesive crystals to the medium sized circles, pearls to the smaller circles and dots of 3D pearl accents to the smallest circles. Cover the very small filled dots, with gold adhesive metal gems.
That’s the complete card, of course you can add different things to the circles to create your own design. I found it quite therapeutic adding the various things to build up the picture. Thank you for visiting, I hope you like the card. All the products used are linked below.
Debbie x
Products Used
- White 5″ x 7″ blank card and envelope
- Dark pink and turquoise card
- A4 Coconut White foundation card
- Bloom and Wild 6″ x 6″ paper pad (for the green paper leaves)
- Chevron slimline stencil
- Foam ink blending tool
- Distress Oxide ink pads Spun Sugar, Seedless Preserves
- Bubble Bloom Fizzie clear stamp set
- Versafine Onyx Black ink pad
- Press to Impress stamp positioning tool
- Watercolour Florals self adhesive crystals
- 5mm pink adhesive pearls
- Gold adhesive metal gems
- 3D pearl accents Frosted Aqua, Vintage Plum
- Bubble Craft die
- Foam Shaping Pad
- Embossing Tool Set Creasing Pens
- Big Shot die cutting machine
- Double sided tape dispenser
- Cosmic Shimmer Dries Clear glue
- 1mm adhesive foam pads

