
Hi, I have been wanting to try out the Sizzix Village Die Set ever since it came into stock last year but this is the first time I have actually found the time. I have
Hi, I have been wanting to try out the Sizzix Village Die Set ever since it came into stock last year but this is the first time I have actually found the time. I have to say I really enjoyed making this little 3D cottage and will hopefully make more different houses and buildings in the future. One thing I forgot to do is take photos at different stages but I hope from the photos of the finished item and the description you will see how I made it.

To Make The House
There are lots of different shapes and sizes of building that you can make with this die set. For this cottage I used the House 1 dies, you can see in the photograph that each die is labelled to make it easier to find the pieces you need.

Cut the walls from white or cream card and the roof and roof tiles from black card. When they are cut, fold all the little tabs over to crease them, then open them out again. Cut a four pane window into the left side wall at the same level as the front windows.

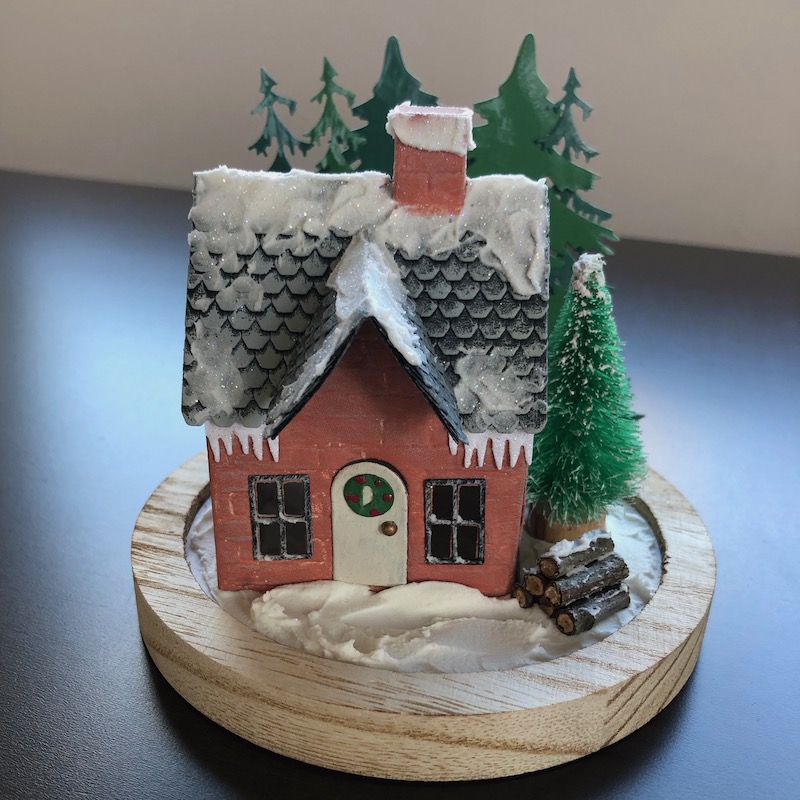
Emboss the walls with the Mini Brickwork embossing folder, then glue them together using the tabs. Paint them with acrylic paint in a dark orange colour, then go over them lightly with some grey to add a bit of definition and break up the colour a bit. You could, of course, cut them in orange but I think the paint adds a bit of extra texture. Cut the strips of roof tiles and glue them to the roof pieces, so that they overlap. The roof tiles die, cuts three strips at a time, two with full tiles and one with half tiles at the ends to make it easy to create the alternating pattern. When all the roof tiles are glued on and the overlapping ends trimmed off, lightly brush with grey acrylic paint to give them a more weathered look. Cut the House 1 porch roof from black card, and tile and paint the same as the roof. Glue the roof onto the walls. That is the main structure complete.
Cut black window frames and mottle them with grey paint, glue them over the window openings. Paint the front door cream. Cut a tiny circle of green card and make a hole in the centre, then add tiny dots of red, to create a wreath to add to the front door. Finish the door with a 3mm adhesive pearl, coloured with a gold marker pen for the door knob. Cut the chimney and emboss and paint it the same as the walls, glue to the ridge of the roof.
Use texture paste to create the snow on the roof and chimnney, sprinkle with fine glitter whilst it is still wet. Cut a strip of grass edging from white card, spread with glue and add glitter, turn it upside down to create icicles and glue to the house front, under the overhang of the roof. To complete the scene die cut a few pine trees, add some white ink to the edges for snow and group them together. As the trees are 2 dimensional I added some card tabs to the bottom so that they would stand up behind the house.

The tabs tuck under the cottage and are covered by snow. Cut a piece of white card to form the base, spread texture paste in a generous layer all over it. Press the tabs on the trees into the texture paste and position the house over the tabs in front of the trees. Press the house into the texture paste so everything is held firmly in place. Make a log pile from a cut up twig and add texture paste for snow. Stand a bottle brush tree next to the house.
I mentioned earlier how much I enjoyed making this project. Looking at it closely again there are one or two things I would change, for example the chimney seems a little bit unfinished and I could have put some acetate or similar on the insides of the windows to look like glass. All things to remember for next time. I hope you have enjoyed reading about my construction, thank you for visiting. Please see the links below for a list of the products used.
Debbie x
Products Used
- A4 Coconut White foundation card
- A4 Black foundation card
- Village Collection die set
- Big Shot die cutting machine
- Mini Brickwork embossing folder
- Opaque Matt texture paste
- Winter Pine Trees die set
- Green Card
- Bottle Brush Trees set
- Acrylic paints Dried Clay, Grey Sky, Light Buttermilk
- Diamond Frost Glitter Dust Sparkle Star
- Picket Fence and Grass Edge die set
- Dries clear glue